Thursday, December 11, 2008
The SheepShaver Chronicles, Part 3
Blog Entry #130
Getting system software onto the virtual hard disk (cont.)
As noted by Rich Trouton in his "Classic on Intel Macs, courtesy of SheepShaver" article at TheAppleBlog, SheepShaver specifically emulates a 100-MHz PowerPC G4 processor in a Power Macintosh 9500 (an odd combination of features given that the Power Macintosh 9500 had a PowerPC 604 processor, which predates even the G3 processor as well as its G4 successor):
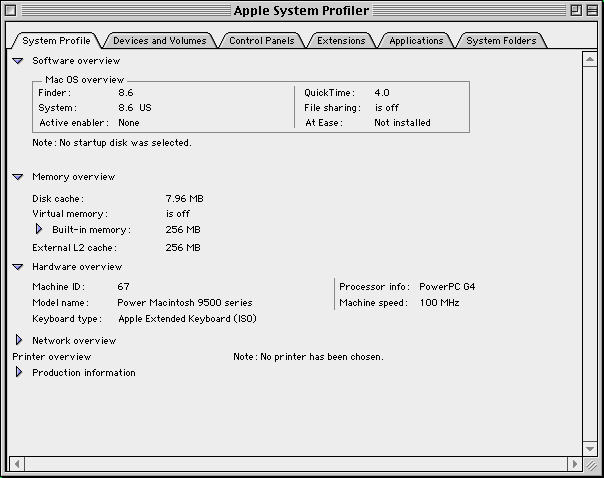
So if once upon a time you had bought a Power Macintosh 9500 or a G4 iMac, would the Software Install discs for these computers install system software on a SheepShaverGUI volume? Maybe - I don't know.
In any case, we saw in the previous post that the Mac OS Install program on the Software Install CD for my G3 iMac definitely will not install Mac OS 8.6 on a SheepShaverGUI volume, for whatever reason. In a related effort, an attempt to copy the Software Install System Folder to the Classic HD disk led to a fiasco of sorts; actually, the copying part went OK, but...
(a) To switch the booting volume from the Software Install CD to the System Folder-containing Classic HD disk, I go to the Control Panels folder under the SheepShaver Apple menu and attempt to open the Startup Disk control panel: this induces a SheepShaver crash.
(b) I relaunch SheepShaver from within the SheepShaverGUI application (with the Volumes tab's Boot From control again set to Any); the following error message pops up:

Clicking the Restart button restarts SheepShaver and pops up the same error message, clicking the Restart button on the second error box restarts SheepShaver and pops up the same error message, etc.; to get out of this cyclical situation, it is necessary to force a quit (select Force Quit... under the OS X Apple menu or type Command-Option-Esc) of both the SheepShaverGUI and SheepShaver programs.
So we're going to have to get system software for the Classic HD disk from another source. Shortly before my G3 iMac crashed and burned in late 2001, I was able to back up (burn to a couple of CDs) the entire contents of its hard disk; these contents include an intact System Folder. Let's put this System Folder on the Classic HD disk and then see if SheepShaver will boot from it, shall we?
In theory, the simplest way to bring my old System Folder into the SheepShaver environment would be to
(a) copy the System Folder to my Intel Mac's root volume, Macintosh HD, and then
(b) use the SheepShaver desktop's Unix disk - the SheepShaver/OS X interface point, which we set (with the SheepShaverGUI Volumes tab's Unix Root field) to the root directory in the previous post - to access it via the /System Folder directory pathway*.
In practice, however, SheepShaver does not recognize the System Folder when I do this; specifically, the System Folder does not show up in the / directory. Regarding my Mac archival materials having a Classic origin, I find that, in general, the SheepShaver Unix disk interface will recognize data files but not executable files (applications) nor folders.
*The / and Macintosh HD directories are in fact identical, as can be shown by executing ls / and ls /Volumes/"Macintosh HD" Unix commands with OS X's Terminal utility.
Disk Utility to the rescue
In his "Running Classic Software on an Intel Mac" article, Charles Ross reports that OS X's Disk Utility application can be used to create startup disks for SheepShaver. In my experience, however, SheepShaver will not boot from a System Folder-containing Disk Utility volume; when I try this, SheepShaver stalls and displays a little floppy disk icon
Creating an empty disk image/volume with Disk Utility is quite simple:
(1) Launch Disk Utility and click the New Image icon in the Disk Utility window toolbar:

(2) This drops down a pane in which various parameters for the disk image and the volume it maps onto are set:
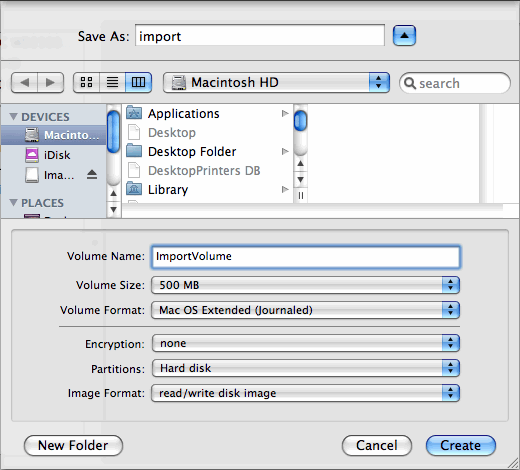
Per the image above:
• Clicking the Create button will place an import.dmg disk image file in Macintosh HD and a corresponding ImportVolume volume on the OS X desktop.
• We'll charge the disk image/volume with a System Folder having a size of about 260 MB, so I've changed the Volume Size: control from its default option, 100 MB, to 500 MB; this causes the Partitions: control to change from its default option, Single partition - Apple Partition Map, to Hard disk.
• I've left the Volume Format: control at its default option, Mac OS Extended (journaled); the Mac OS Extended and Mac OS Standard options are also OK for this control.
Adding the G3 iMac System Folder, or any other file/folder, to the disk image/volume is now a simple matter of dragging it into the ImportVolume volume.
We can straightforwardly bring the System Folder-containing disk image/volume into the SheepShaver environment as follows:
(1) Launch SheepShaverGUI and then click the Volumes tab's Add button.
(2) An Add Volume window opens via which both import.dmg and ImportVolume can be accessed; somewhat strangely, only import.dmg can be 'read' by SheepShaver (**vide infra).
(a) In the root directory Files list, select import.dmg.
(b) Click the Add Volume OK button to finish up and return to the SheepShaverGUI Volumes tab, whose volume menu now lists /Volumes/Classic HD (the volume we created in the previous post) and /import.dmg.
(3) Booting from the Software Install CD, click the SheepShaverGUI Start button. The Software Install desktop will show disk icons for the iMac Install CD, ImportVolume, Classic HD, and the Unix interface (import.dmg does not appear on the desktop).
(4) Double-click/open ImportVolume: you'll see the System Folder and may also see a .fseventsd folder, a .Trashes folder, and a .com.apple.timemachine.suppo#18 file (I have no idea what this other stuff is).
As noted above, SheepShaver will not boot from the ImportVolume disk, so:
• Copy the System Folder to the Classic HD disk (which is currently empty; recall that we initialized/erased it previously).
• An attempt to switch the booting volume from the Software Install CD to the System Folder-containing Classic HD disk via the Startup Disk control panel again triggers a SheepShaver crash. Alternatively, go to the Special menu and try to Restart the emulated environment; this also causes SheepShaver to crash on my computer - arrgghhh - but generates the dialog box below:
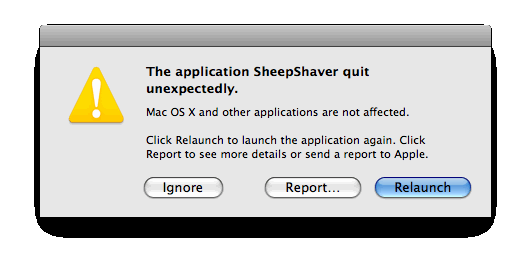
When I click the Relaunch button, SheepShaver smoothly (and from this point on, reproducibly) boots from the Classic HD disk - success!
**FYI: Here's what happens when I try to bring /Volumes/ImportVolume/ into the SheepShaver environment:
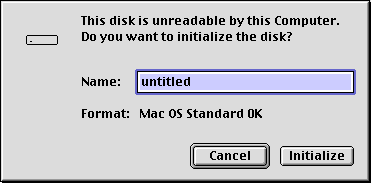
0K?? I type ImportVolume into the Name: field and click the Initialize button, popping up the "Initializing will erase all information on this disk" box; clicking the latter box's Continue button generates the following alert( ):
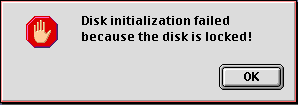
I click the OK button; ImportVolume is not mounted on the Software Install desktop.
But perhaps you don't have an appropriate System Folder lying about. In the next entry, I'll show you a better and more interesting way to put system software on a SheepShaverGUI volume.
reptile7
Actually, reptile7's JavaScript blog is powered by Café La Llave. ;-)

